Lover of cardmaking and growing devotee to a new passion of art journalling and mixed media
Friday, 20 April 2012
Lilac A6 House Mouse Card
There appears to be a growing trend for the larger format cards, A4 and 8x8 and although I am also a lover of the larger format cards for special occassions and just when the fancy takes me. I felt it necessary to go back somewhat to my cardmaking roots and start to reintroduce the smaller format cards A6 as this appears to be a much overlooked card size at the moment, so although I am not mocking the current trends I didnt think it would hurt to downsize and see where it took me.
This is my first endeavour and contains a lovely pale lilac card stock used in a landscape format. This was stamped over using a small peg floral stamp and mouse foot print before distressed using milled lavender and dusty concord around the edge of the cardstock.
Secondly I created my own backing paper inspired by a recent Sheena Douglas demonstration where I applied splodges (technical term) of milled lavender and dusty concord on to my craft sheet, I then shook up my chosen shimmer mist in Angel Mist from Cosmic Shimmer and spritzed the craft sheet before placing my paper face down on to the inks. This created a lovely piece of mottled backing paper to coordinate with my card stock and image. This was then cut to size using deckle edged scissors and placed to the left hand side of the card.
The next layer was a dark lilac centura pearl card again cut down to size and matted on to the card with a deckle edge.
Finally the House Mouse topper, this comes from the Allsorts Weight Lifting stamp sheet. As with most of my house mice they were coloured in using sandstone and blush however, for the baby on this occassion I used putty and blush so there was a slight difference.
The cup was coloured using the following promarker colours of lavender, orchid and plum. The shadows were accentuated using warm grey 1 and two on both the images and for the shadow beneath the cup and bottle.
The water was coloured using the following promarkers cool aqua and duck egg blue with a small amount of denim blue for the waters movement and some waterfall stickles to highlight the light on the water. The waterfall stickles were also applied to some of the bubbles which were also highlighted in cool aqua. The bottle was coloured in cool aqua, warm grey 1 and daffodil bloom (from the spring set) for the label. The bottle cap was left white with warm grey 1 and 2 added dimension and shadow to the cap.
The topper was then cut using a spellbinder dye with a rectangular deckle edge and placed on to the other matts on the card.
To complete the card, I then made a bow out of the purple shades of twine from the vintage and pastel sets from creative expressions and adhered this to the card with pin flair glue gel. Finally to complete it I threaded a lilac button using two shades of lilac/purple thread and placed this at the centre of the bow, all from my crafty stash.
I hope you like this card.
Emma
Wednesday, 18 April 2012
Happy Birthday Love Bug
I have recently attended a Spring Cardmaking Class at Stamp Addicts in Bedford near where I live, they are a constant source of inspiration and their unmounted stamp range offers a wide selection of materials to drawn your inspiration.This card was inspired from their Love Bug unmounted stamp sheet which contains these adorable love bug/bumble bee characters which I feel cover a variety of occassions, in this particular instance a birthday card.
I found some amazing red card stock and decided to do this card in white, red and silver. The card was a A5 white card with its corners rounded using my crop-a-dile, I then placed a matt of red card stock, matt silver dotted cardstock as the base of the card.
I then cut a piece of white card stock to fit beneath the Marianne Designs Designable 908 which I had cut and embossed using my cuttlebug in the red cardstock and cut out the central panel. I marked the central panel on to the white card stock with a pencil to enable me to stamp the sentiment before placing this and the red designable panel on to the card.
I then stamped the love bug holding the flowers twic using memento black ink as I then coloured the first image in full using a pale pink flex marker in pale blossom using the bullet tip to create a shadow of the image. This took three coats to get the right colour I wanted for the shadow. This was then cut close to the image with the antennae removed. The antennae were then added using silver glitter wire from papermania and adhered to the base image with double sided tape. This image was then added to the card in the bottom right hand corner using pin flair glue gel for dimension.
The second and top image was coloured with the hand and face in satin and blush, the foliage for the flowers was meadow green (from the spring set) and the remainder of the bug was coloured using antique pink, cerise and magenta with the stipes accentuated using black fine tip promarker. At the centre of the flowers I used some perfect pearls to add definition and dimension then I cut around the love bug leaving a small border and removing the antennae. Once cut out the characters white edge was removed using the pale pink flex marker and then adhered over the shadow image using pin flair glue gel for three dimensionality.
Finally to complete the image, I added three flowers in a similar shade of red and accented their centres using silver circle accents from my crafty stash.
I hope you like the card.
Emma
Monday, 16 April 2012
Your Just the Sweetest
Apologies its been so long posting on my blog, I have unfortunately been unwell and also on my return back to work so busy I have not been able to card make or blog as much as I would have liked.
To make amends I have posted above my first card made using Kraft card, I have completely fallen in love with this card stock and you will see a recurring theme in this nature I am sure over the next few months as I get back in to the swing of things.
The card shown above is made using some stunning peach glitter card stock I had in my crafty stash which I felt went extremely well with the kraft card and also the wonderful House Mouse rubber stamp from Joanna Sheen which was coloured using promarkers (sandstone and blush) for the mice and the new spring colours (fresh meadow, budding rose and daffodil bloom for the floral element), I then cut the image out using a current favourite from my spellbinders dyes (fleur des lyes rectangle) which I then shaded using a light application of worn lipstick distress ink, I finally accented my topper with some stunning copper kaisercraft pears and large peach Kort & Godt flowers again from Joanna Sheen.
I hope you like this card and look forward to shoring you some further cards as the week progresses.
Many thanks for looking.
Emma
Wednesday, 1 February 2012
Come Fly With Me
I as with many crafters often struggle when making cards for my husband and male family members. Thankfully the CD Rom called the Nostalgia Collection by Kevin Walsh and packaged by Joanna Sheen has become a godsend in all things mens cards.
This year Pops was so keen to have me make him a handmade card rather than a bought one that he went out and bought a steam train die cut image for me to make his card with. This is not a train I hear you say, no but I wanted to surprise him with this card for his birthday and shall use the decoupage at a later date.
The inspiration for this card was all down to my Pops love of airplanes from WWI and WWII plus his time in the RAF working as an electrician on Lightnings before my brother and I came into this world. With this in mind I adored this image and decided it would make a phenominal card for Pops and a complete surprise from what he is expecting.
This is an A4 Card used Landscape and has three basic initial matts in silver dotty cardstock, glitter navy card and the sky backing paper from the CD Rom.
The next matt layer consisted of an A5 glitter navy matt with two smaller rectangular panels added in the silver and sky papers to add a depth to the card and draw the eye to the central image. This was adhered to the card using pinflair glue gel to add height and dimension. and a sentiment label was added beneath this.
Finally the image matt consisted of a glitter navy then silver background to which the image of the plane was mounted (printed on a gloss photo paper) and finally the two smaller image pictures were cut out using a 2" punch and mounted on a small matt of silver dotted card before adhering to the top and bottom corners of the main image using pin flair glue gel again for dimension.
I struggled with getting a suitable insert for some of my A4 cards in the past however, on this occassion I used the cloud background sheet again, this time maintaining the small plane in the bottom right hand corner and ran this through my printer again using my verse writer software. This finalised the card superbly and gave me the handmade but professional finish that I sought.
I hope you like this card as much as I enjoyed making it, please feel free to leave me your thoughts.
Emma
Wednesday, 11 January 2012
Digital Image Card
This is a beautiful digital image from Cuddly Buddly which I have printed on to high quality supersmooth paper and left to dry before colouring it in using my promarker pens, this stunning image was then placed on to a antique gold marble effect paper and then on to an olive piece of coordinations card stock distressed using a sander.
I then placed my sentiment in a matching green ink beneath the image and a border using more coordinations card cut into a 1" strip and run through a paper punch. I then used a gold organza ribbon to accentuate the border.
I hope you and the design team of The Paper Shelter like this card as it is my application to join their design team.
Many thanks
Seaside & Button themed Crafting Challenges
Well the nights have been dark early so I have taken the opportunity to start prepapring cards for the forthcoming year.
Christmas cards are made and behind us and although the day itself is two sleeps away, what better time than now to take some time for family, friends and of course ourselves.
So as an early start to my New Years resolution to take part in more Blog challenges, I have my second blog challenge entry below for Cupcake Crafting based on their sketch.
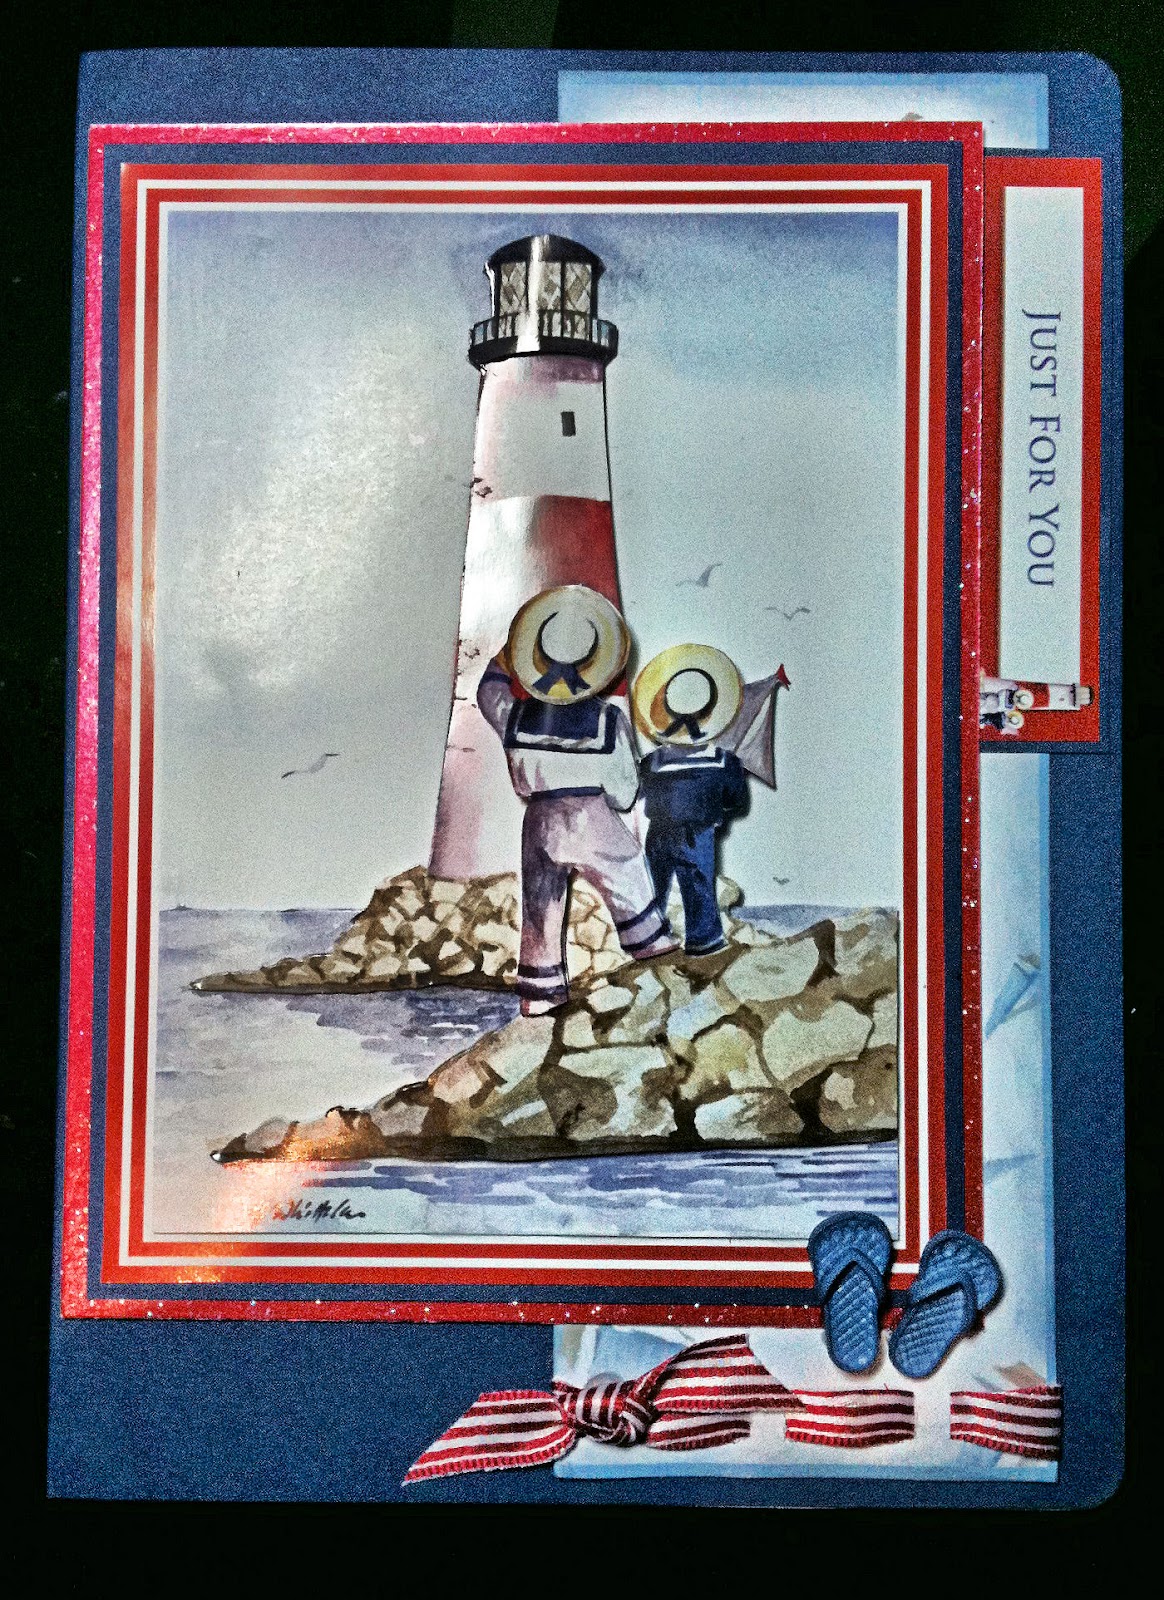
This was created on a navy blue A5 card blank from Craft Creations and I rounded the two right hand edges with a Cropodile Corner Chomper. The base backing paper comes from Faye Whittakers CD Rom available from Joanna Sheen and was distressed around the edges with Stormy Sky Distress Ink, I then punched the base of the panel with a ribbon punch and threaded the naughtical silk ribbon through. The knot was tied and added seperately. This panel was then applied to the right hand side of the card.
I then affixed the sentiment on to a small amount of card and added to the top right slightly over hanging the panel using glue gel. I then made the main image matt, this took the Faye Whittaker Decoupage Image and mounted it on a base matt of Navy and then a subsequent matt of glitter red. I added this to the card front using glue gel and once dried applied the further decoupage layers.
As a final finishing touch I then found the flip flops in my crafty stash and appied these to the bottom of the card for effect.
I hope you like this card, and thank you for taking the time to look at this creation.
Blogs Entered:-
Cupcake Crafting Challenge
Crafty Sentiments Designs
The CD Sunday Challenge
Catered Crop Challenge
Christmas cards are made and behind us and although the day itself is two sleeps away, what better time than now to take some time for family, friends and of course ourselves.
So as an early start to my New Years resolution to take part in more Blog challenges, I have my second blog challenge entry below for Cupcake Crafting based on their sketch.
This was created on a navy blue A5 card blank from Craft Creations and I rounded the two right hand edges with a Cropodile Corner Chomper. The base backing paper comes from Faye Whittakers CD Rom available from Joanna Sheen and was distressed around the edges with Stormy Sky Distress Ink, I then punched the base of the panel with a ribbon punch and threaded the naughtical silk ribbon through. The knot was tied and added seperately. This panel was then applied to the right hand side of the card.
I then affixed the sentiment on to a small amount of card and added to the top right slightly over hanging the panel using glue gel. I then made the main image matt, this took the Faye Whittaker Decoupage Image and mounted it on a base matt of Navy and then a subsequent matt of glitter red. I added this to the card front using glue gel and once dried applied the further decoupage layers.
As a final finishing touch I then found the flip flops in my crafty stash and appied these to the bottom of the card for effect.
I hope you like this card, and thank you for taking the time to look at this creation.
Blogs Entered:-
Cupcake Crafting Challenge
Crafty Sentiments Designs
The CD Sunday Challenge
Catered Crop Challenge
Saturday, 7 January 2012
Craft Stamper (Feb Issue) Second Valentines Inspired Card
So on reading all my craft stamper magazine (february issue) from cover to cover in one sitting in the wee small hours of the night when I could not sleep. I decided that I would continue to make a further card using the inspiration from the Designer's Palette segment.
This is one of my favourite areas of the magazing as it inspires you to use colourings and combinations you wouldn't necessarily try, this week was based on the vintage reds, browns and beiges. As you will see the shape of the card is also a little unusual and again this was inspired by the articles contents.
First of all I decided to go for a DL Card as I have lots in my crafty stash and fancied a change from A5 and 8x8 cards. I then started on the main focal point of the card to do this I tinted the base of the card using Tim Holtz Tattered Rose distress ink for that vintage feel, followed by a deeper layer of Frayed Burlap. Once this had been dried with my heat tool, I then covered this area using sticky notes to cover this area and I then sprayed the top area of the card with a mixture of Cosmic Shimmer Angel Mist and a few random drops of Tattered Angels Candy Apple Red which I then blotted to take away any excess ink.
Next I removed the sticky notes and used the words from a Stamp Addicts plate in Frayed Burlap across the base of the card starting with overstamping of the coloured bottom areas and going into the sprayed section. To complete the focal point I lastly took the free heart stamp from the magazing and stamped this in Barn Door to the top centre area and filled in using a waterbrush filled with cosmic shimmer powder to add an irridescents as with the earlier card.
I now applied this on to a larger deep red card matt before layering again on a larger wood effect brown card using 1mm foam tape. To complete the topper, I used a charm and ribbon left over from a famous brand of chocolate and secured this to the card using extra strong tape to the front and rear of the topper.
Finally I then adhered the completed topper to the card using Pin Flair Glue Gel to enable some further dimension.
I would appreciate any comments or feedback you may have on my cards.
Many thanks
Craft Stamper February Issue - Designer's Palette Inspiration
This card was inspired from an article in this February's Craft Stamper, I did not have the necessary colours suggested so I did my own colour interpretations using the following distress inks from Tim Holz:-
Spun Sugar (for the bottom line of the card)
Frayed Burlap (for the top line of the card and second stamped using Judikins vine stamp on the bottom line)
Barn Door (for the sentiment, heart and butterflies)
The borders were drawn in with a ruler and the Red Gold Metallic Promarker.
The central panel used the stamp of a heart that came free with the magazine which was stamped in Barn Door and filled in using a watercolour brush filled with gold cosmic shimmer to add irridescents.
I then stamped the butterflies and dragon fly using two layers of ink in Barn Door and Freyed Burlap, before the ink dried I then used a damp paint brush to fill in areas of the butterflies and dragon fly to accentuate them.
To complete this card I then stamped the sentiment which came from a Crafters Companion Popcorn Stamp Set in Barn Door and adhered three pink pearls to the brown line and three brown pearls to the pink line for definition and texture.
Sunday, 1 January 2012
What a great way to start the year - Josephine Wall Decoupage
This is a large 8x8 square card that I used a We R Memory Keepers Crop-A-Dile Corner Chomper on, I then placed a pale peach matt on to the card again with a scallop edge to it.
I then made two seperate panels the first panel to the back and right of the card consisted of a burnt orange cardstock run through my cuttlebug with a circular embossing folder, I then sanded down the embossed image to distress the image and display the paler peach core within the cardstock. This was then matted on to a piece of lime green cardstock and put to one side, I then added the sentiment which was also mounted on the burnt orange and lime cardstock on the top centre of this panel.
The second panel is the one to the bottom left of the card, this was compiled off the base Josephine Wall decoupage image (available from Joanna Sheen) on a matt of burnt orange cardstock and then the coordinating lime green cardstock.
I then used my cuttlebug to cut out the flowers and swirl using marianne designs and the offcuts of the coordinating card stock. As you can see I placed one swirl going to the bottom right of the card and a further swirl going to the left of the embossed panel which I adhered before placing the first panel on top using glue gel. I placed the second panel on to card using glue gel and then completed the decoupage image, with the final hummingbird fairy and butterfly layer being given some glitz from spray and shine.
I then placed all the die cut flowers on the card using glue gel for dimension and to secure the cream pearl centres. Finally to balance the card I added three pearl accents to the bottom left hand corner.
Friday, 30 December 2011
Faye Whittaker Garden Decoupage
This was an A5 Cream card blank originally which I colour tinted using distress inks in tattered rose and worn lipstick. I then used a decorative Crop-A-Dile Corner Chomper from We R Memory Keepers in Scallop.
I then printed off a backing paper sheet which coordinated from the Josephine Wall Enchanted Dreams CD Rom from Joanna Sheen and placed this in my spray booth and used Crafters Companion Spray and Sparkle on it in Multicolour, before mounting this on to the base card. I then took some red silk ribbon and placed a border at the top and bottom of the floral backing panel.
I then mounted the Faye Whittaker Garden Decoupage base image on to a small mount of red mirri board and attached all the decoupage layers using pin flair glue gel. The two sentiment panels were also mounted on a small matt of red mirri board before using glue gel to mount these at the top left and bottom right of the card.
To add some dimension to the card a small red silk ribbon bow was placed in the top left hand corner sentiment and a bouquet of red paper flowers and pink rose buds were added to the bottom left.
I hope you like it.
Thursday, 29 December 2011
Tuesday Blog Challenge - Have a purrfect day!
This card was put together using a sketch from Tuesday's Blog Challenge, as you can see I chose a plain cream A5 base card and decided to build the design around a burnt orange, dark peach and peach card stock paper pieces interweaved together, the image is from Penny Black which I stamped using memento black and coloured using promarkers before mounting on a burnt orange frame and adding some paper flowers for dimension.
Mojo Monday - Have a Mice Birthday
This card was designed using a sketch from the Mojo Monday Blog Challenge. Unfortunately the colours in the top three pieces of card appear to be coming out more grey than teal in this photo but I can assure you that they are three graduating colours of teal with the darkest layer punched with a Artemio loop punch.
The image used is a spring House Mouse unmounted stamp and sentiment from Joanna Sheen the sentiment was stamped in an Encore Ultimate metallic inkpad using those colours that closely fit the card. The image was stamped in black memento ink and coloured using an assortment of Promarker and Flexmarker colours. Finally to complete the card I attached two paper flowers in the same teal colours on top of each other and added a centre made up of cream pearls.
I hope you like it.
Friday, 23 December 2011
Tuesday Morning Sketches Challenge
So this time I decided to challenge myself by entering a Sketch Challenge using a stamp set I had bought and not yet had the opportunity to use from Stamp Addicts and also some paper and accessories from my crafty stash.
As you can see I adapted the sketch to suit a 6x6 Square Card, which I decorated with a corner punch. I then made a paper ribbon using a burnt orange card stock and a loop border punch and adhered this to the bottom of the card, the next layer added was a green matt.
The gnome stamp was done in memento black ink and the image coloured in using promarkers Satin/Blush for the Skin, flex marker light fawn and promarkers tan and caramel for the arm chair. The hat and trousers were stamped on to a peach card, cut out and pieced to the stamped image, the same was done with the jacket which was in the same green shade as the matt above. The beard was given dimension using liquid applique applied sparingly in circles to add texture and then heated with a heat gun. The image then had decorative corner punches applied before attaching to a peach card matt. This was then mounted to the card using glue gel.
The sentiment was handwritten and mounted on a fine matt of the burnt orange card stock and a second matt in the green cardstock with the top edges rounded and slotted behind the stamped image to create a tab look to the sentiment.
Finally in keeping with the sketch I selected coordinating colours from the image and found three small buttons which were adhered to the top right hand corner with glue gel.
I hope you like this card.
As you can see I adapted the sketch to suit a 6x6 Square Card, which I decorated with a corner punch. I then made a paper ribbon using a burnt orange card stock and a loop border punch and adhered this to the bottom of the card, the next layer added was a green matt.
The gnome stamp was done in memento black ink and the image coloured in using promarkers Satin/Blush for the Skin, flex marker light fawn and promarkers tan and caramel for the arm chair. The hat and trousers were stamped on to a peach card, cut out and pieced to the stamped image, the same was done with the jacket which was in the same green shade as the matt above. The beard was given dimension using liquid applique applied sparingly in circles to add texture and then heated with a heat gun. The image then had decorative corner punches applied before attaching to a peach card matt. This was then mounted to the card using glue gel.
The sentiment was handwritten and mounted on a fine matt of the burnt orange card stock and a second matt in the green cardstock with the top edges rounded and slotted behind the stamped image to create a tab look to the sentiment.
Finally in keeping with the sketch I selected coordinating colours from the image and found three small buttons which were adhered to the top right hand corner with glue gel.
I hope you like this card.
Sunday, 18 December 2011
CD Sunday Blog Winning Card
With great thanks to the CD Sunday Blog challenge for selecting this House Mouse Image for its winning blog entry, I have been fortunate to get the Rachel Anne Miller Collection CD Rom winging its way to me in the New Year, what a fantastic Christmas surprise.
A new challenge starts today for the next two weeks with a 50's theme please take the time to view the blog and enter this new challenge.
Wishing everyone all the best for this Christmas Season and an amazing New Year.
Thursday, 1 December 2011
Joanna Sheen Blog 1 Entry
This is a card I have made for submission to the first Joanna Sheen Blog entry. As you can see this is using the House Mouse Ginger Bread image and a couple of smaller images from other sets.
Firstly I made the background paper using some of my xmas paper scraps and my 2" square punch, on cutting these out I prepared a piece of card with strips of double sided tape and began laying the patchwork in a diagonal design as better seen in the picture below.
To create the faux patchwork effect I used a promarker fine liner pen to go along all the edges using a zigzag faux stitch pattern and around the edge of all the faux patchwork a dash line pattern. I then mounted this on a matt of gold and then red mirri board to bring out the colours of the patchwork.
I then stamped the house mouse images on to Neenah cardstock and coloured them using blush and sandstone for the mice, ginger, honeycomb and oatmeal for the gingerbread house and pale flex marker colours for the sweets, the candy cane and sweet used berry promarker, to tie this in with the patchwork effect I also put a faux stitching effect around the outside of the main image. This was then mounted on a red mirri board mount and a further gold and red mirri board mount to raise the image from the card.
The sentiment was stamped using Red Versafine ink and mounted on a piece of red mirri board and placed at the bottom of the card, I cut out the two mice and mounted these either side of the sentiment using pinflair glue gel for dimension.
Lastly to complete the card I wrapped a plain red satin ribbon around the spine of the card and then a textured red ribbon over the top which I tied in a central bow and accented the roof of the gingerbread house with crystal stickles for a bit of sparkle.
Saturday, 12 November 2011
Floral Delights
This card was made using a 8x8 card blank covered in the coordinating backing paper to the image from Joanna Sheens new From the Heart of the Garden CD Rom. To the left hand side a border was made using coordinating Nostalgia Coordinations card stock punched using a loop punch. This was overlayed with a further border of pink cardstock using a scalloped edge and then threaded using a ribbon punch and some white ribbon.
The main image was printed on to canvas paper and layered on to a matt of silver mirri board given dimension with pin flair glue gel. The butterflies were decoupaged on and glittered to ensure they stood out from the image.
A tag was created to mount the sentiment on using the same cardstock as that used for the border and attached to the card using the same ribbon from the border and a silver floral brad to complete the look.
This simple 8x8 scalloped card was tinted using spun sugar distress inks, then a matt of the Mothers Day calligraphy paper was added to the card from and a layer of ruffled ribbon to the base to add texture. A subsequent matt of silver mirri board was added to the centre of the card using pinflair glue gel and then a flat matt of the floral backing paper. Another silver mirri matt was added with glue gel and two further flat layers of citrus green card and the base floral image From the Heart of the Garden CD Rom.
I printed a further three full images of the flower and cut them away to make a decoupaged and dimensional flower for the centre, curving it with an embossing tool before attaching with glue gel.
I hope you like these two floral cards.
Em x
The main image was printed on to canvas paper and layered on to a matt of silver mirri board given dimension with pin flair glue gel. The butterflies were decoupaged on and glittered to ensure they stood out from the image.
A tag was created to mount the sentiment on using the same cardstock as that used for the border and attached to the card using the same ribbon from the border and a silver floral brad to complete the look.
This simple 8x8 scalloped card was tinted using spun sugar distress inks, then a matt of the Mothers Day calligraphy paper was added to the card from and a layer of ruffled ribbon to the base to add texture. A subsequent matt of silver mirri board was added to the centre of the card using pinflair glue gel and then a flat matt of the floral backing paper. Another silver mirri matt was added with glue gel and two further flat layers of citrus green card and the base floral image From the Heart of the Garden CD Rom.
I printed a further three full images of the flower and cut them away to make a decoupaged and dimensional flower for the centre, curving it with an embossing tool before attaching with glue gel.
I hope you like these two floral cards.
Em x
Dreams
This A4 card in fact stemmed from a disastrous attempt at an A5 one and is now one of my favourites that I've done this year. The A4 cream card blank shows the stunning decoupage flower from Joanna Sheens CD Rom "From the Heart of the Garden" off to its fullist extent in my opinion and also gave me the opportunity to use my favourite sentiment stamp "Dreams come in a size too big so that we can grow into them".
I initially printed off the decoupage and matching backing paper from the CD Rom. To make the base matt I selected some coordinations cardstock from the Nostalgia collection and mounted an A5 matt of the butterfly backing paper on to it. I then stamped the sentiment using an Encore Metallic ink pad on some spare cream card and mounted this on to a matching cardstock and silver mirri board mount and placed this on the card using pinflair glue gle to raise it from the card base.
I then created the matching cardstock and silver mirri board mount and placed the base floral image on it and again mounted this on the card using glue gel. I then cut and placed the floral layers on the image on the card.
The swirls were cut using again the coordinating nostalgia card stock on my Cuttlebug and glued in place to the card, once dried matching pearls were added to the swirls to give some decadence.
On the top right hand side coordinating card candy was added and on the bottom left hand side three leaf shapes were cut in the nostalgia card stock on the cuttlebug and glittered before adding matching paper flowers to complete this card.
I hope you love it as much as I did. It goes to show that sometimes even a card disaster can be turned into something truly stunning.
Emx
Butterfly Wishes
For a change I decided to use a DL card landscape to make this birthday card with the help of Joanna Sheen's CD Rom From the Heart of the Garden.
This CD contains a whole section of stunning calligraphy backing papers and sentiments which can be used to embellish our cards.
As you can see from this card I colour tinted the edge of the card using the metallic blue pen from Papermania, I then printed and cut to size the blue happy birthday calligraphy paper from the CD Rom ensuring that the sentiment was visible in full so that no further sentiment would be required.
I then used a stunning butterfly backing paper from the CD which I placed on a silver mirri board matt to make a square matt and placed this to the left hand side of the sentiment using pinflair glue for dimension. I placed a smaller silver mirri board matt on top of the butterly matt and proceeded to cut out a number of butterflies in different sizes from the butterfly topper. I initially bent some silver metallic wire round a paintbrush to make the antennae for the larger butterfly and glued this in place on the card using pinflair glue gel, I then placed the full image of the butterfly on top again using glue gel. The top layer was cut away and glittered before again adding to the main butterfly with glue gel.
I then placed the other assorted butterflys to the topper using pinflair glue gel and added some subtle glitter accents.
I hope you like this card as it was a work in progress which turned out pretty good.
Thanks for looking
Emx
Another Autumnal Delight
I love the sentiment on this card "All seasons are beautiful for the person who carries happiness within". This is another card made using Joanna Sheen's latest CD Rom "From the Heart of the Garden" which was released earlier today on Create and Craft.
This uses a 8x8 scallop edged card blank colour tinted to match the imagery using Tim Holtz distress inks in Dried Marigold, Wild Honey and Vintage Photo. There is then a matt of the stunning co-ordinating backing paper to go with the image and then graduated layers of Coordinations Nostalgia cardstock in browns and oranges to go with the autumnal feel of the image. The base layer was put on to the card and they the decoupage was added using pinflair glue gel for added dimension, the two butterflies were accented using glitter spray prior to placing on the card. To complete the final look I accessorised using three copper effect flowers to add some further dimension (again attached with pinflair) and three co-ordinating pearls added to the flowers and on the top edge of the card.
I hope you like this card as much as I did making it.
Emx
Wonderful new cards made by Jayne Shasky images
This is a stunning image with an Autumnal feel from the latest CD Rom by Joanna Sheen. From the Heart of the Garden contains stunning imagery from the artist Jayne Shasky and will give any crafter stunning material to make cards such as the Easel Card you see to the left. This was made using an A4 Card Blank, I also used Coordinations card stock in shades of green from the Nostalgia block, Flourish gold paper from HOTP and the stunning leaf backing paper from the CD Rom.
I then took the image and cut a gold mirri board mount which again was stuck on using some dimension from the pinflair glue gel. The image then had the border masked off accept for the leaves and sprayed with irridescent spray & sparkle, this was mounted on to complete the card front and a small bronze ribbon embellishment with a bell added.
As you can see from the photo above for the easel stopper I used an Artemio loop punch to create a border in the olive card stock, I then placed a central strip of the autumn leave backing paper bordered by bronze metallic pen. The two bird images were taken from the same image sheet printed off and layered on gold mirri board. The sentiment was created on the computer and also mounted on mirri board. The ribbon behind the easel was in fact ruched by hand using extra strong tape.
I hope you like this card.
Em x
I initially covered the card using olive green cardstock layered on to the base card, the edges shaped with the Scallop We R Memory Keepers punch. I then distressed the HOTP gold embossed flourish paper with Scattered Straw, Dried Marigold and Crushed Olive distress inks before cutting the two matts required. I placed the first matt of flourish paper on flat placed a further olive card stock layer again edged by the scallop punch, and attached the Autumn leave backing paper printed from the CD Rom on this. I then added a slightly darker olive matt to this card using pinflair glue gel for dimension and two scallop edged flourish panels to the left and right hand sides.
I then took the image and cut a gold mirri board mount which again was stuck on using some dimension from the pinflair glue gel. The image then had the border masked off accept for the leaves and sprayed with irridescent spray & sparkle, this was mounted on to complete the card front and a small bronze ribbon embellishment with a bell added.
As you can see from the photo above for the easel stopper I used an Artemio loop punch to create a border in the olive card stock, I then placed a central strip of the autumn leave backing paper bordered by bronze metallic pen. The two bird images were taken from the same image sheet printed off and layered on gold mirri board. The sentiment was created on the computer and also mounted on mirri board. The ribbon behind the easel was in fact ruched by hand using extra strong tape.
I hope you like this card.
Em x
Subscribe to:
Posts (Atom)